
Page 87 - Vauxhall 20-60 H.P. (R Type) Chassis Shop Manual
P. 87
VAUXHALL 20-60 SHOP MANUAL
All the valves are numbered 1 to 12, and care must be taken to ensure that
each one is ground in and finally fitted to its correct seat.
It is essential that the valve springs are replaced correctly, i.e., the end of the
springs at which the coils are close together must be against the cylinder head.
Replace cylinder head and reset valve clearances ( Sections 406 and 410 ).
VALVE SPRINGS — TO REPLACE
SECTION In the event of valve spring breakages, these can be easily replaced with
409 the cylinder head in position. Remove rocker cover. Turn the engine over
by hand until the valve on which the spring is broken is in its fully closed
position. Remove sparking plug and tappet covers. Compress the valve
rocker by means of the hooked end of the valve spring compressor supplied
in car kit, so that the steel ball at the rocker end of the push rod can be
removed. Keeping the rocker compressed, lift the push rod off the tappet,
care being taken not to allow the steel ball at this end to fall between the
side of the crankcase and the tappet block, and so into the sump. Rest
push rod on side of crankcase. Release pressure from valve rocker. Insert
the opposite end of the valve spring compressor under the rocker bearing
and depress the valve springs. A bent rod placed through the sparking plug
hole may be used to hold the valve on its seat while depressing the valve
springs. Remove the split collars from under the shoulder on the valve stem.
Release pressure from valve springs and the springs and washer can then be
removed. Fit replacement valve spring by reversing foregoing operations,
seeing that the end of the springs at which the coils are close together is
against the cylinder head.
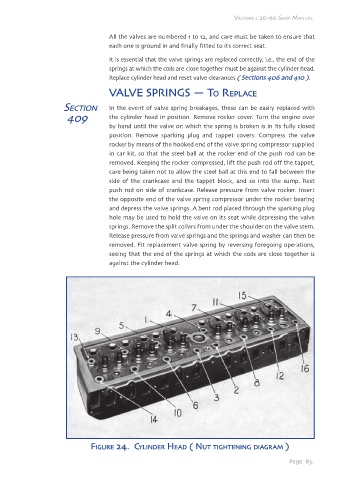
FIGURE 24. CYLINDER HEAD ( NUT TIGHTENING DIAGRAM )
Page 83.